Monday, July 18, 2011

A few interior accessories

I finally finished a couple projects around the house that I've been dying to get done.
First was to add some accessories to the powder room downstairs.
The only downside?  Of course I took my pictures today while my cute hand towels are in the wash.  Ah,well.
I'm getting this done!  ;)

I made a couple of floral sconces to go on either side of the mirror by wrapping some wire around the tops of these pretty yellow bottles, giving them a little 'loop hook' and hanging them on a hook screwed into the wall.  Super easy!  :)

click on photos for larger view
 My mirror was originally gold, but I discovered this silver paint enamel at Michaels that is sooo much cheaper than spray paint and seriously looks like gorgeous metal.  Awesome!  And I love these little silver accessories to go in the cabinet.
 Add a little yellow printed paper behind the cabinet glass and you've got some extra flare...
These little wall canvases were on sale at Michaels for only a dollar.  They already had the gray print around the outside and I drew/cut out the little paper bird, painted him a little shadow around the edges, and mod podged him on.  I love these!
 I made little window treatment toppers for Miles bedroom forever ago.  I kept thinking I'd wait for Brian to help me hang them up, but you all know how the weekends go!  So finally a few weeks ago, with my 30 week belly, I just hung them myself.  And did a pretty good job I'd say.  Thank heaven for power drills. 
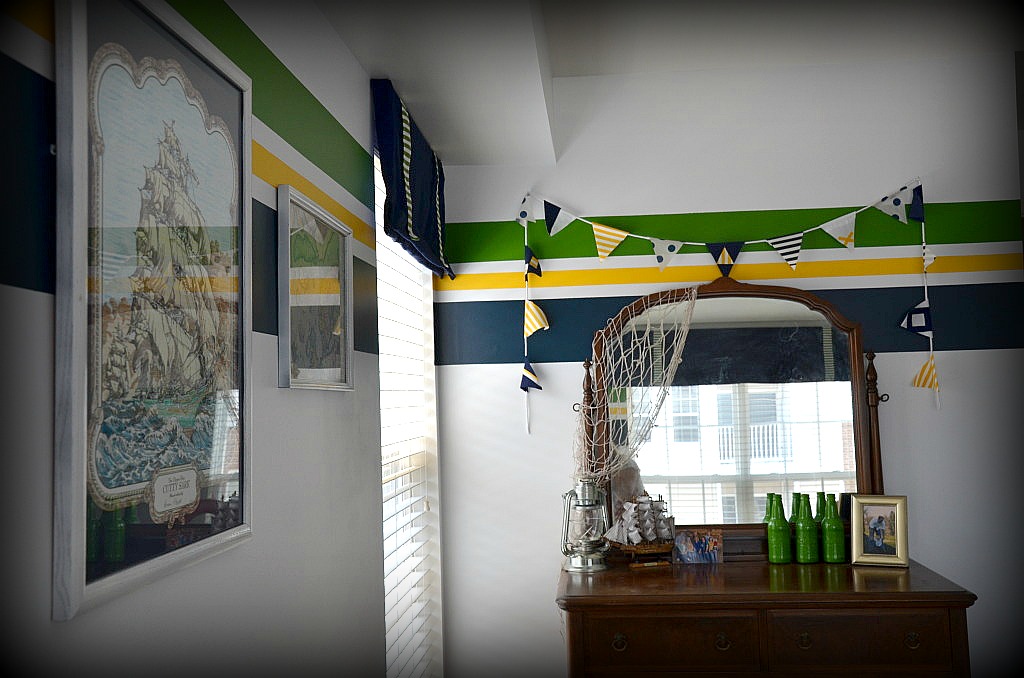
I've become a little obsessed with just about all things nautical, so that's the theme I went for in Miles room.  The stripes on the white wall make me think of a sleek sail boat... I just love his room.  :)  I made the fleece octopus pillow on the glider too.  I love how graphic it turned out!
 I made the nautical flag bunting- so fun.  I actually looked up a bunch of official flags to get inspiration for the designs.  It's kind of hard to see, but hanging on the wall is a large picture of a clipper ship that Brian colored when he was about 9 or 10.  It's one of my favorite things in his room!  Flanking the ship are a couple of old world maps I found at a consignment store.  They've got a bunch of giant ships sailing the oceans on them with sea monsters and something written in Latin.  They are seriously cool.  Plus we've got these awesome bottles that I painted green on the inside, a little miniature of the Mayflower, a "ship's lantern" (or camping lantern, but you know, it works ;) and a net thrown over the mirror for good measure (maybe in case Miles needs to catch any mermaids?)

 Ah, his big grown-up boy bed.  :)  I made the little anchor throw at the bottom and the polka dot pillow.  His room's not complete without his big buddy shark, Chompy!  (such a fabulous IKEA find ;)
 I made this little framed sea shell art collections from shells we found last year at Virginia Beach.  I love it when your art is tied to a memory.
And now after the baby grows out of the bassinet in about 4 months we'll be rearranging the room.  :)  But that's all right.  I'm excited for these boys to share a room together!  (I'm just glad I don't have to shove a little girl into this extremely boyish room!)

Thanks for reading!  :)

Friday, June 17, 2011

Anthro Inspired "Sea Urchin" Clutch Tutorial

I know, all you faithful post readers ;) that you were anticipating a blog about my additional powder room decorations, but that little project currently has me on a search for one last item, and this project came up in the meantime.  :)  Hope you don't mind.

So a couple weeks ago whilst browsing at one of my favorite-but-can't-afford-anything stores (aka Anthropologie,) I spied this little clutch and thought, "I think I could make that!"
 I was excited for the challenge!  And truly, I did challenge myself.  I looked up no instructions, only tried to exercise this poor pregnancy brain of my mine to put together this cute little clutch.  And: success!


Here is my tutorial on the "sea urchin" clutch. 

Materials you'll need:

Paper, pencil, and 4" dia bowl/cup (for drawing the pattern)
1/2 yd  fabric
3/4 yd lining fabric
7" zipper

Start by drawing a pattern that you'll place on the fold of the fabric that looks like this: 
I wish now that I had rounded the bottom, so feel free to do that if you'd like.  I also didn't remember seeing a little bit of gathering that the clutch looks like it has in the photo from Anthropologie above.  If you'd like to add some pleats to the top, extend beyond 4", sew in the pleats the way you'd like, and then follow all the instructions below.  Just some extras!  :)  I also drew my pattern on the computer, so you can do that too if you having a drawing program you like!

First, cut two pattern pieces from your outer fabric and two from your lining on the fold.  Then cut two, 6.5" W x 21" H strips from your lining fabric or another coordinating fabric of your choice for the ruffles.
Next, turn the short ends of your strips 1/2" towards the wrong side of the fabric and pin right sides together down the long length.  Stitch the long ends, leaving short ends open, and turn right side out.  Stich the short ends with a small seam allowance.

Now create your strips into ruffles by making little pleats.  :)  I'm not going to lie, I totally eyeballed mine, but I pleated about every inch, pulling each little length to the pleat before it until I came to the end.  You want to have a finished length of 8".  This seemed to work out pretty well!  Stitch along the bottom with a 1/4" seam allowance.
Here comes a smorgashboard of sandwiching layers... but I promise you can do it!  I stitched each layer individually so that everything would stay in place.  Begin with your outer fabric right side up.  Lay your ruffle across the top, right sides together, and stitch across the top with a 1/4" seam allowance.  (The stitched side of the ruffle should be laying across the top, where the fabric is pinned in the photo.)
 Next layer is the zipper.  Lay face down across the top of your ruffle and stitch as close to the zipper as possible.
 Lastly, lay your lining fabric, right side down (so the wrong side of the fabric is facing you) onto the top of the zipper and stitch with a 1/4" seam allowance.  Be careful not to stitch over your zipper!
 Repeat each of these steps on the other side of the zipper with the remaining fabric and ruffle.

Ok, now first things first, UNZIP YOUR ZIPPER HALF WAY.  You'll be stuck if you don't!  :)  Now pull your outer fabric together, right sides facing, and lining fabric together, right sides facing, looking somewhat like a butterfly (see picture below.)  Pin all the way around, being careful to tuck in the edges of the ruffle so they don't get caught in the seam allowance.  Leave a 3-4" opening along the bottom of the lining for turning.  Starting at one edge of the opening of the lining, stich a 1/2" seam allowance ALL the way around the clutch, ending at the other side of the opening, (and being careful stitching over the zipper.)
 To creat a little "bottom" on the bag: on both the outer fabric and lining, open your seam allowance on each curve and pinch the fabric out and flat.  Measure 1-2" along the seam, mark with a pin, and pin in place.  Stitch horizontally across the flat section.  (Exactly where the horizontal pin is placed in the photo below.)  Trim excess fabric.
 Turn the bag right side out through the opening and stitch the opening closed.

Voila!  A little sea urchin clutch!


Doesn't the opening where the zipper is look like some sort of sea creature?  I couldn' t help but think of some sea urchin or clam everytime I open it up.  So cute!  And now it's housing all my makeup.  :)  I hope my directions were clear and that you enjoy! Thank you for reading!  :)

Thursday, June 9, 2011

Feeling Festive: The 4th

I found a tutorial last year on how to make a fabric star garland.
My mom LOVES patriotic decor and the 4th of July, so there was no way I could pass by the tutorial when a red, white, and blue star garland could be oh so cute! 
I think I sent her the tutorial last year, but I made her one this year for her birthday anyway.
And if I'm making one for my mom, I gotta make one for me, right?  :)

You can make one too, if you like it, by going to
Click on her link to 'tutorials' and you'll see a picture of the star garland.

This wasn't a quick, one afternoon project, but you can end up with an adorable garland to hang up year after year.  I love that she mentions that you can make this in any color scheme for things like birthday parties or baby nurseries... so cute.

So here's my patriotic stars:

You start out with five diamonds that get sewn to make the front and back of each star.


Big Brown Eyes
 My projects aren't complete without other little projects for littler hands lying around too :)
here are some pre-stuffed stars
 And voila!  I'm so ready for bbq's and fireflies and swimming time and fireworks and watermelon and just all the fun that comes with the 4th of July!!
I absolutely love the gradation of size in the stars.
click on the photo to see a larger image


gotta love the wii going on, right?... this is what's giving me my bloggin time ;)
 And I've got a little festivity hanging on the front door too :)

Can't wait for the 4th!  :D

Next on the list of things to do: a little powder room decor

Saturday, June 4, 2011

In my Garden (er... someday garden)

I've always dreamed of someday having a beautiful garden...

Right now all we have is a little patch of grass (stained by everyone else's dogs... I won't even go there...) but we've tried to make our little patch beautiful. 

And I think we're off to a good start.  :)  I keep thinking, someday, when we have our own little house and a real yard and garden to start, we'll have some good stuff ready to put in it!

So today we made a trip first to Homegoods (I think we've been to Lowes almost every Saturday this summer) finally found a pot and a trellis that we like (at a decent price, hoorah!) and then we went to Lowes again.  For beautiful flowers.  :)  That make me so happy. 

Now someday I need a fountain.  ;)

Isn't the trellis and pot pretty? The trellis matches our wooden planter boxes by the front door, and the pot actually shines kind of deep blue/black/and brown all at once. I love it!

This whole plot began with the wisteria plant Brian bought in the spring. It was growing up our balcony, but we thought she'd do better out front on a beautiful trellis. We've literally been looking for weeks and weeks for a new home for this poor girl (she was definitely outgrowing her plastic planter pot.) I'm so glad we found something for her to climb up and spread out of! Plus I LOVE the other flowers and the Creeping Jenny down the front... Ahhh... Someday, I WILL have a beautiful garden.


We had a not-so-small friend come visit us during our potting session! Ok, he wasn't huge, but he's wasn't a tiny little lizard either. He had to have been about 6 in. long. I've never seen one like this around here before! I was glad to catch a shot of him before he hid away in the bushes.

pretty Foxglove

<><>

can't remember what these little beauties were called, but I love how they feel a little bit tropical

pretty pink geranium (these are pretty easy to keep alive, right?) haha- because that's the kind of plants I need
Add caption

I hope I saved my best/most artistic shot for last.  ;)  I still need to have Leilani take me out and give me a photography lesson!  And then a photoshop lesson, haha.  :) 

It would be a dream come true to someday have a garden that looks like it could be plastered across the cover of Better Homes and Gardens.  *sigh*  A girl can dream, right?  :) 

Wednesday, June 1, 2011

Vintage-esque Summer Pillow Covers

I don't think I ever really clarified what my real intent is behind this blog...

My biggest hope is that it inspires a project for you to do!  I love looking at other people's work and thinking, "Hey- I would love to do something like that, but maybe in this other way?"  So I hope this blog is always an avenue for inspiration!  I've thought about writing out tutorials for things, but I think I'll leave that on a 'per request' basis.  If you really like something and want step-by-step instructions on how to do it, I'd be happy to write up a tutorial!  I think most everything is pretty simple- so hopefully just seeing things put together can inspire you on how to make your own.  :)

I had my spring pillows out on the couch and felt that times were a'changin'...

90+ degrees can stomp spring out of your mind pretty quickly.  ;)
So I made some summer pillowcovers!  My goal was mellow, soft, and vintage-y feeling.  I knew I wanted to applique some stuff onto the blue linen I had.  And I wanted to try making them 'envelope' style.  So here's how they turned out!

Thank you Michaels for your assorted collection of mini doilies  :)  That's definitely what put these over the edge for a 'vintage' look to me.

I had fun making the flowers out of the same fabric as my larger pillows on the couch.  It all feels very unified.

I <3 buttons!


The pillows have already been put to some good use.  What's fun is that the large pillows are reversible too.  I haven't had the stripes facing forward for a while, and I really like it with the new pillows!
Here is the 'envelope' style back I was talking about.  I think pillowcovers are about the greatest thing ever.  Cheap IKEA pillows that can be changed every single season?  Yeah, that rocks!
Ahahaha goof ball.  If the camera is out, there must be pictures taken of "ME!!"
He's so dang irresistable.
 So go get some pillow inserts and have a blast making cute pillow covers!  :)  Next project on the line:  A patriotic stuffed star garland that is ADORABLE. 

Friday, May 20, 2011

Glee Inspired Summer 'Very Pink' Trench Bag

Did anyone see the Glee episode where Quinn wore this bag?

It was seriously love at first sight.
 Paul gave me a fun, summery pink and white fabric a while back and I've been dying to make a summer bag out of it.  There was even a solid pink linen in the bunch to use as lining.  I decided trying to replicate this 'trench coat' bag would be so fun! 

I started, as per usual, with a little sketch.  I changed up the pockets a bit so I could make them functional- I love an outside pocket for my keys and for my phone.  This would give me one for each!


Now it was time to start cutting and sewing!


Always my little helper ;)  This is always the face I get too when he knows he's being a stinker
 And... Voila!  A trench coat inspired bag!  Very pink, right?  But super fun for summer.  It was so fun playing with the grain of the fabric to create different looks on the bag.  And, ok, I really love deals, so I have to throw in that I found the buttons at JoAnn's on sale for .25 per two pack and got 40% off the zipper I used for the pocket inside.  I think this bag cost me a grand total of about $2.00... You can't beat that!

I really really wanted to go shoot these photos outside in the woods, but alas.. ya gotta work with naptime.  I'm noticing too that my bag isn't quite so round as Quinn's, but this is a fully functioning diaper bag.  Sa-weet!

Sweet little trench pockets- one for the keys, one for the phone.  Fabulous!  I made my pocket hole the same way I would for a zipper, just left out the zipper and added the flap.  Worked wonderfully!


Now I can't wait to wear it out and show it off!  :)

I plan to make another one in the fall in a solid much more like Quinn's... So darling.

Next up... pillows.  Coming soon!